Monday, 16 March 2015

Giant Needles/Knitting

Appearing all over the place is giant knitting, and I would not mind giving this a go. Knit Picks has 3 pairs of giant needles, and I would love to do something with them, make a super chunky blanket, could you imagine how fast that would knit up? Or at least hopefully.


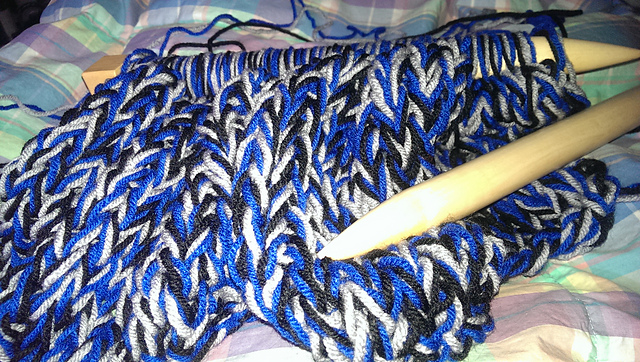
I picked up some US Size 50 needles. I am not 100% sure where to go from here, but I do know that if Buffy the Vampire Slayer becomes our reality that I will be prepared for what comes my way.
Vampire slaying and knitting all in one combo, I see good things for the future.


One of my Tardis blankets is quite scratchy, and I feel that it will be too scratchy for sensitive baby skin, so I am going to frog that and knit a blanket with these instead. I will have 3 strands of yarn, I might pick up a ball of white and do 4 strands, then it will be bigger and far more substantial. Now I think the claim to fame of these needles is that you can knit a blanket in 6 hours with them, so I guess I will be timing myself with this project to see how it goes.


The night I bought them I did complete about a 5 foot long scarf in 3 hours, it was out of a fluffy baby wool, but it was quite cozy. I have high hopes for this blanket.


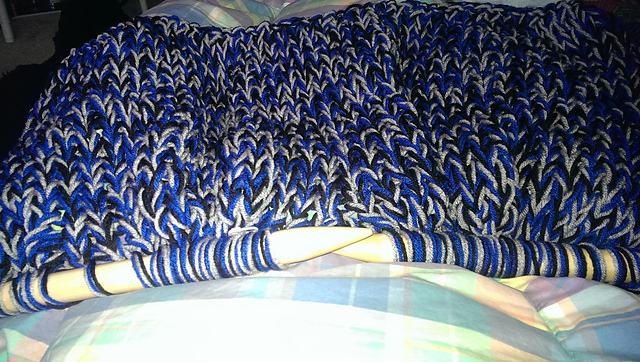
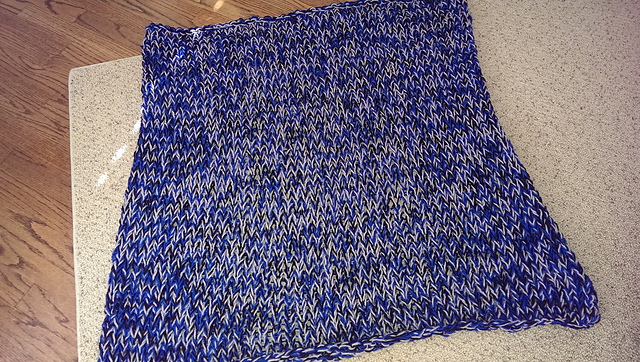
The big test, they were fun. I cast on 60 sttiches and then proceed to knit about 61 rows and cast off on row 62. What I got was a HUGE blanket, the needles are only about 12 inches long, but I think another 10 cast on stitches and another 10 rows would have made a difference. So it is around 4 feet by 4 feet, and looks fairly snazzy.

Notes: I found it was quite easy to drop a stitch when working on this, so you kind of need to pay attention, and when I do this again, I think it would be beneficial to have 5 or maybe 6 strands of size 4 yarn. I am also trying to think of a pattern that you could work on this and make it more visually stimulating. I will keep you posted .

Have fun giant knitting. 

-A

Tuesday, 24 February 2015

Curd Tarts

When someone, not from Yorkshire, thinks of a Curd Tart, I am fairly sure you are thinking of a lemon curd for a lemon meringue pie, but my friends if you are from Yorkshire, which my mom is, you will immediately think of a curd tart, which is literally that. Cheese curd, dried fruit, eggs, sugar, and a liqueur of some form in a tart shell. Now in Yorkshire you can buy fresh curd from the butcher, but in Canada not so much.

 So, that is what I made.

I started with a cheese making kit that I was given for Christmas. The cheese making kit was for Feta, now I started with every possible intention of making said Feta, but did not get to those dizzy heights. The kit asks you to turn 4 litres of milk into cheese over the course of 2 days, yes 2 days, it was worth it I promise. Yield is low but the taste was heavenly.


4 litres of milk yielded around 500 grams of cheese, or curd if you will.


Recipe time:

  • 500 g fresh curd
  • 2 eggs
  • 100 g sugar (or less)
  • handful of dried fruit (sultana's, raisins, currants, cherries, blueberries, cranberries)
    • choose 1, for this I used cranberries
  • 2 tbsp of liquor (brandy, rum, amaretto, grand mariner)
    • choose 1, for this I used amaretto
  1. Put all of your ingredients into a mixing bowl and mix until everything is well combined. 
  2. Preheat oven to 325 - 350 degrees F
  3. Spray 14 small tart shell forms and fill almost to the lip of the foil tray. 
  4. Place in oven for about 20 minutes, then let cool and enjoy. 


These are traditionally eaten cold, but I found them delicious either way. Now for this I did not make a tart shell I used the tin as my tart shell. This makes this treat gluten free, and I did not find a shell necessary. Some out there might call it blasphemy that I did not make tart shells but it was a personal choice and sometimes a tart shell ruins the overall deliciousness of dessert, depends on the tart shell.

You did read that right, it took me two days and 4 litres of milk to make 14 small tarts, still I say it was worth it, and I would do it again in a heart beat. 


Thursday, 19 February 2015

February...

For February I have accomplished the reading of 'Heartless' by Gail Carriger, which I must add I was finished by February 6, which is amazing. The second book I finished this month was 'Charm' by Sarah Pinborough.

I have now also completed the Physalis lace scarf found here: http://www.ravelry.com/patterns/library/physalis which turned out beautifully, it was a long time getting finished but I feel better now that it is. I used a baby weight yarn, and 6.0 mm needles, and I am so pleased that I am finished it. Not sure what I am going to do with the projects that I am finishing but you never know, so I will keep finishing them.


Knitting I have on the go:
  1. I Like Lime: http://www.ravelry.com/patterns/library/i-like-lime
  2. Dragon Stole: http://www.ravelry.com/patterns/library/dragon-stole
  3. Opt Art: http://www.ravelry.com/patterns/library/opart
    1. This is my mindless project that I work on in between everything else that is more complicated, it might take longer to finish, but I will get there in the end. 
  4. Illuminated Lines Blanket: Thank you Knit Picks
  5. Circlet Cardigan: Thank you Knit Picks
  6. Tardis Afghan x 2 (Yes I have two on the go)..might soon have three, scary.
    1. One of these I need to have finished by May, but the yarn is a bit scratchy so I just need to either figure out how to make yarn softer, or use the softer Yarn I have to make a different one...Thoughts?
  7. Fingerless Mittens: http://www.ravelry.com/patterns/library/fingerless-mittens-8
    1. I have 1 complete and about 25% of another one complete, a matching pair is within my grasp. These are beautiful, I want to do them on smaller needles with smaller yarn, it will take longer, but they will be less thick. Sadly these ones are in black which makes them hard to photograph nicely.
  8. Reverie Beret (I have done so many of these I could do them in my sleep, but I have made 1 or 2 minor adjustments to make it my own)
  9. Entrelac scarf, I do not think I am going to finish this per se... who knows
  10. Feather and Fan Blanket
  11. Mitered Square blanket in Parrot...I was crocheting this into something, but I did not like it, I still don't really like it but it will happen. 
Technically all of these should get finished before I start something new, but the temptation to start new patterns some days is just too great. 

Ciao
-A

Thursday, 5 February 2015

January....

Has drawn to a close, and I had some basic resolutions put in place. Finish at least one book a month and one yarn project a month. Here they are in the picture:

 The book I started sometime last year, and is a sequel, it was good but did start to dwindle towards the end, or maybe it was me that started to dwindle....


The blanket was started in January and finished in January, a miracle, one that I am impressed by thoroughly. My mom did the edging for me as I am quite bad at edging. But she went along two sides doing 3 stitches then 1 stitch, the other two 2 stitches then 1 stitch.The corners are single crochet, chain 4, single crochet. Do this once. Then single crochet, 1 chain and skip a chain then single crochet. The next row where you have the hole from the chain loop the single crochet.

Then miracle of all miracles, a class I have on Saturday was cancelled, and so I managed to finish yet another blanket, and I also finished another book, blanket here:

The book was Charles_HRH "Guide to Britishness" an excellent read if you are from England, but I am still baffled as to whether or not it was in fact written by the Prince, or if it was in fact written by someone else, the jury is out, and if you know I would appreciate being filled in.

I do not think I would make a very good knitting instructor...I can knit and crochet things to my hearts content but it throws me off if I have to explain how to do it to someone else or how to write it down so that someone else will be able to understand what it is that I am doing. Probably why I am not a tutorial blog just a word vomit with a few pictures blog.


The goal for February, finish "Heartless" by Gail Carriger, and finish this lovely scarf, which was started quite some time ago. The scarf is on the right, and it is a Physllis Lace pattern. When I discovered this pattern there was also a hat, which was completed some time ago and the scarf just hung around. Having cleaned out my cupboard the other day I dis covered it again, and am determined to have it finished by the end of February.


Ciao,
-A

Sunday, 25 January 2015

Working on.....

I started another blanket because I can, and because a friend is expecting a baby in May, she likes Doctor Who and is expecting a boy so I thought perfect, a Tardis Afghan, there is a pattern for one on Ravelry already but it is 6 feet by 9 feet, which is quite large for a baby, so I sat down and wrote a new one. This is about 3 feet across and I have no idea how long it will grow to, but I am praying for proportion. Here it is started:
It is working out really well, but the yarn is a bit harsh on ones skin. I have found different yarn, and I am loathed to start it again, but I might just do that in thinking about the finished result. I will leave this on the needles, and finish it with matching yarn, that is my next thing find blue yarn that matches this yarn to finish this blanket :) I just need to decide if I finish this one and then do the one specifically for my friend or start the new one and then finish this one.....WHO KNOWS, just need to finish something. 

The lovely and slightly dreaded I Like Lime blanket, I messed up on my first repeat and made it so that I now have a more intricate and exciting pattern on my hands. I am at about the halfway point, but I am out of yarn, so until I allow myself to purchase more yarn for this it will remain unfinished, harsh but true, and very disappointing as I was hoping this would become my January I got something finished project but something will take its place very soon. 


These blankets are amazing to crochet, I have done about 3 of them by now, the light pink one got finished, the turquoise and pink one is in a box waiting for me to finish it, the Caron soft yarn, is VERY prone to split when you go through it with a crochet hook, so it sits in a box waiting for me, maybe I will make it my you must finish this in February project.

My January project is one of these blankets, as I can crochet on a plane or in an airport with comparative ease over flying with needles, I do not mind loosing a hook but loosing needles would make me cry. The one I am about to finish is Grey and Purple, and looks fabulous. I cannot wait to share it with you all.


Keep on crafting,

-A

Thursday, 22 January 2015

Getting Your Manicure to Last

When I decided to start painting my nails again (after the removal of my acrylic's, this was necessary, they were weak, brittle and splitting in several places) I had to come up with a solution to get them to last at least 5 - 7 days, otherwise I was not going to bother. So I bought the gel manicure system, which was probably a good place to start, as the curing does aid in making the nail feel stronger, but if you read my other blog on this: "Nailed It'. I know I promised pictures, I will see if I can do them during the break. You will know that removing this is less than satisfactory to me. It is the scraping, I cannot abide the scraping, my nails hate it.

If you read Loodie Loodie Loodie, which I recommend you should, she is all about healthy nails. And I agree 100% start with healthy nails and your manicure will last far longer than on sad nails, which is where the gel is good because it will still last on sad nails. But having to cure the gel top coat in the morning instead of at night was getting to me, and the scraping, oh the horrors.

So, once you have attained your healthy nails through OPI Nail Envy, Essie's Grow Faster, Essie's Grow Stronger, Wtichcraft, Trind, or any of the Sally Hansen nail growth systems, and my personal favourite base coat with minced garlic added you are on your way to success. That and starting with clean nails that are free of oils, so start to paint right after you have removed your old polish, don't run your hands through your hair, or moisturize...wait and do the moisturizing at the end. If you are going to file and buff your nails. File your nails before the old polish comes off, then remove polish, buff nails and then re-acetone your nails before the polish application. I have used OPI's chip skip, and it is doing the same thing as the acetone, just with a brush instead of a cotton pad, your choice really. Buffing aids in removing any splits or imperfections in the nail and also gives the nail a slight grittiness, you cannot feel it, which gives all this polish a place to grab onto.

Currently because I live in Calgary and it is so dry here the process is:
  1. Garlic base coat,
  2. One of my base coats that is creamer looking, I have convinced myself they are moisturizing, one of them must be because it is working. Let all this dry.
  3. Paint the free edge of my nail, underneath my nail, and then the top 1/2 of the front of my nail, do this on all fingers then let dry. 
  4. Apply polish to the full nail, free edge and back of nail, the back of the nail is only really necessary if 
    1. you have nails that are longer than your finger ends,
    2. it really bugs you to see the the white colour of your nails, which it does for me and I find polish lasts longer when I do this, so I keep doing it. Then let that dry 
  5. Repeat step 4. Let this dry a little bit longer than the last coat.
  6. You now should have perfectly covered nails. Then finish with your top coat, right now I am using a CND in a large round bottle. Remembering to cover the free edge 
  7. Repeat step 6. 
  8. Once your last top coat has dried for a tiny bit, grab your favourite cuticle oil or an olive oil and brush it over your cuticles allowing the excess to run down to the tip of your nail from the cuticle. This creates a barrier between your nails and some of the outside world. It is also at this point that I will carefully apply a moisturizer to the rest of my hands. 
Then I read for about 20 - 30 minutes and then pass out with my hands clasped together hanging over the edge of the bed to prevent sheet marks. I do all of this while sitting in bed, it saves moving later on, and I have m laptop in there with me so I can watch a DVD or something on you tube, it helps the time to pass and makes the process feel a touch less tedious.

Also yes you did read that correctly. We are at about 7 layers of nail polish. Now if you have a really thick formula you might just need to do 2 coats, but I usually do very thin coats so it has always worked. Then If you want to keep your nails looking shiny, you can after three days add a layer of top coat, but stay thin. This way I can do my nails on a Sunday and by Saturday evening they are still in a condition where I feel that I can go out without people, and ten remove and repeat.


On the left hand side of the screen is a picture of my nails finished, after I did them Saturday morning. The picture on the right is a picture of them 6 days later. The only wear is on the pinky, and that is because if I am having a stressful week it is the only nail I will allow myself to gnaw on, so if it weren't for this then they would be perfect. Also I was going for a turquoise stone effect, whether or not I achieved it is debatable. I could not get water, hairspray or rubbing alcohol to form veins n the water bath to dip my painted nails into.


See you

-A


Tuesday, 30 December 2014

Hat Spam

I have been knitting a fair amount of hats recently, mostly because I am doing them as presents for the ladies in the office. So I technically only have four to do, but I might do five. And here are some of the hats. Yes I managed to crop three of them. Great times.

So, here we have the Elleby, the Gwen, and a Spiral hat that I love, all of these can be found on Ravelry, look for: aspensquiver. Also the first two are the Elleby Hat, but modified. The True Elleby is the grey one in the middle at the bottom. It is a beautiful hat, but for me I was not loving 100% the k3 p3 idea, so I changed it to a k6 p3..and am working on writing that pattern down so that more than I can knit this fabulous hat, and then I am developing a k9 p3, it will come soon.


What is your favourite hat to knit?
-A